Discover how to craft a DIY flower wall for any special event or just as a delightful project! Flower walls are not only a stunning addition to celebrations but also a wonderful way to unify people or introduce some natural beauty into a space. You can create breathtaking DIY flower walls for various occasions using fresh flowers, significantly enhancing your décor.
Table of Contents
DIY Flower Walls
- Step-by-Step Guide: Learn the process of constructing a flower wall, from selecting the right flowers to assembling the structure.
- Customization Tips: Tailor your flower wall to fit the theme of your event or personal preference.
Floral Arrangements
- Design Techniques: Explore different styles and techniques to arrange flowers, ensuring your wall is both vibrant and visually appealing.
- Maintenance Advice: Gain insights on how to keep your flower wall fresh and lively throughout your event.
Wedding Flower Arrangements
- Bridal Themes: Discover how to align your flower wall with wedding themes, creating a romantic and memorable backdrop.
- Flower Selection: Learn about the best flower choices for weddings, considering both aesthetics and symbolism.
Creating a DIY flower wall is an enjoyable and rewarding endeavor that adds a touch of elegance and charm to any gathering or space
Flower walls are a beautiful and versatile addition to various events, including wedding ceremonies, receptions, vow renewals, anniversary celebrations, photo booths, and as eye-catching backdrops for special occasions like baby showers or birthday parties.
These floral creations are not only ideal for adding an extra touch of elegance to celebrations but also serve as a wonderful project for bringing people together. They can infuse a space with natural beauty, brighten up an area, or help transition a setting into the spring or summer seasons.
While the use of artificial flowers is a viable option, the charm and allure of live flowers elevate DIY flower walls, particularly for outdoor events such as spring and summer weddings. The impact of real flowers in these settings is truly remarkable.
The quantity of flowers needed depends on the size of your flower wall. Generally, a more abundant floral display creates a more impressive impact. Incorporating moss, leaves, or other greenery can enhance the wall, adding depth and a more natural, visually appealing aesthetic.
Creating DIY flower walls with fresh flowers, leaves, and vines not only enhances the beauty of your event but also adds a unique and personal touch to your décor.
Creating a DIY single-panel flower wall is a straightforward and elegant way to enhance any occasion. This project can vary in size, from a standard foam core or poster board to a large wooden panel covering an entire wall.
Supplies You’ll Need:
- Foam core board or your chosen panel material
- Hot glue gun
- Scissors or wire cutters
- Command strips or Velcro hanging pieces
- Flowers (real or artificial)
- Any additional decorative elements
Steps to Create Your Flower Wall:
- Prepare the Panel:
- Begin by decorating or painting the foam core board, especially in areas that might remain exposed or not covered by flowers.
- Prepare the Flowers:
- Use scissors or wire cutters to trim the flowers to the desired size. This may involve removing stems, leaves, or thorns from roses.
- Attach the Flowers:
- Employ a hot glue gun to affix the flowers to the foam core board or your chosen panel. You can also use resins or staples for attachment, depending on your preference.
- Mount the Flower Wall:
- Finally, use command strips or Velcro hanging pieces to secure your flower panel to a wall or structure. The number of strips you’ll need depends on the panel’s size and weight. Ensure they are evenly spaced and applied to a flat, clean surface for optimal support.
This DIY flower wall method is not only easy but also allows for customization to fit any event theme or personal style, making it a perfect addition to your celebration or space
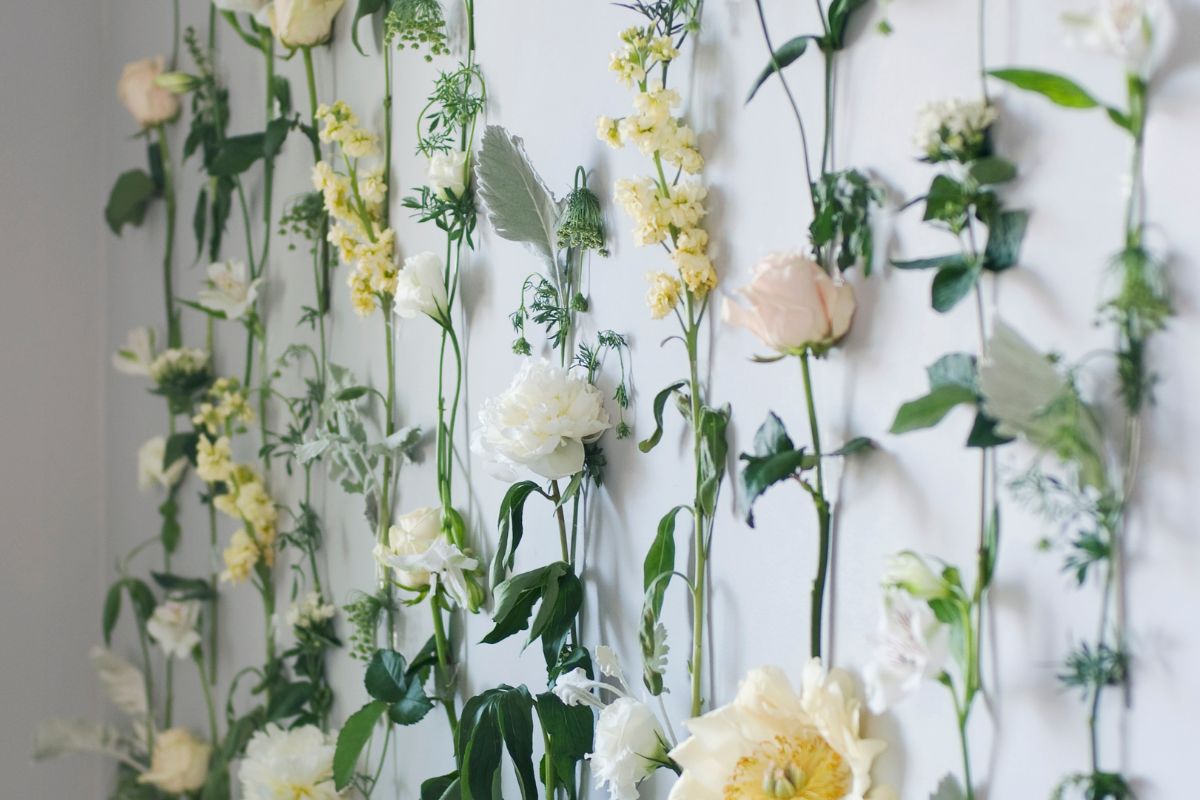
Creating a Hanging Flower Wall is an elegant and organic way to incorporate florals into your event or space. This approach involves suspending flowers from a focal point, allowing them to cascade down and create a visually stunning display.
Supplies You’ll Need:
- Washi tape
- String, rope, twine, or similar materials
- Flowers, stems, leaves
- Metal or wooden rod
Steps to Create Your Hanging Flower Wall:
- Set Up the Rod:
- Begin by securing a metal or wooden rod to a stable point. This could be a curtain rod attached to a window or wall, a wooden slat fixed to an existing wall, an outdoor post, gazebo, or any horizontal beam. This will act as the anchor for your hanging flowers.
- Prepare the Strings:
- Get creative with your choice of string, be it rope, twine, or other durable materials, to suspend and arrange the flowers in a wall-like formation.
- Arrange the Flowers:
- Depending on your design preference, you can choose to keep the stems for easier hanging or include leaves for additional greenery and to fill spaces between flowers, enhancing the cohesive look of your flower wall.
- Attach the Flowers:
- Secure the flowers to the string by either tying them around the stem or using washi tape for attachment. You can also intertwine ivy or vines with the flowers, aiding in the hanging process and adding an extra layer of decorative charm.
- Direct Application Option:
- If you prefer not to hang the flowers, washi tape offers a colorful and easy alternative to attach flowers directly onto a wall or board.
A hanging flower wall provides a beautiful balance of natural elegance and artistic expression, requiring less effort than a full wall display yet still creating an impactful floral statement.
Adding flowers to signs is an inventive and charming way to enhance their visual appeal. This method is particularly effective for entrance signs and special event signage, where a touch of floral elegance can make a significant impact.
Flower-decorated signs may not constitute a full “wall” of flowers, but this style of floral design can have a substantial effect, especially when used across multiple signs or decorative elements. Wedding signs adorned with flowers, for example, have gained popularity and are frequently used in both ceremonies and receptions.
Supplies You’ll Need:
- A picture frame or wood board
- A metal or wooden stand
- Glue, zip ties, or string
- Markers, paint, stencils
Steps to Create Flower Décor Signs:
- Prepare the Sign:
- Utilize existing picture frames and free-standing signs as a base for your flowers, or create your own from metal or wood.
- Decorate the Sign:
- Paint your sign using stencils or freehand techniques. Make sure the paint is completely dry before proceeding to the next step.
- Attach the Flowers:
- Use a hot glue gun to adhere the flowers to the sign. If you prefer to keep the flowers fresh, attach them with zip ties or string. Drilling small holes in the board can simplify the process of attaching the flowers.
- Arrange the Flowers:
- Place flowers at the top and sides of the sign or wrap them around the post. This is a great opportunity to get creative with your floral arrangements.
Creating DIY flower decor signs for any occasion is not just a way to enhance the aesthetics of your event; it’s a chance to unleash your creativity and add a personalized touch to your celebration.
Flower arches, while not exactly walls, are a hugely popular feature for special events, celebrations, and particularly weddings. They provide a stunning backdrop and offer a myriad of design possibilities, making them an ideal choice for DIY flower arrangements for any occasion.
Flower arches can be crafted from various materials, with wood and metal being the most commonly used. They serve beautifully as backdrops for wedding ceremonies or as focal points for other events.
Supplies You’ll Need:
- Wood posts and boards, or metal
- Nails & wood glue
- A selection of fresh or artificial flowers
- Hot glue, string, zip ties, floral cage, or wire
Steps to Create a Flower Arch:
- Construct the Arch Base:
- Begin by building the base for your flower arch, using either wood or metal. The design of the arch is only limited by your imagination – from elegant circular arches to rustic square ones, choose a style that fits your event.
- Attach the Flowers:
- Once your arch is constructed, start attaching flowers, vines, and greenery. Depending on the material of your arch, you can use hot glue, or secure the flowers and vines with twine or string.
- Use Floral Foam Cages:
- Many florists opt for floral foam cages, which allow for easy attachment of flowers by their stems. These cages can be stacked or drilled into the arch, providing ample space to densely fill the arch with flowers.
- Explore Design Options:
- Don’t hesitate to get creative with your flower arch. Experiment with different shapes, colors, and types of flowers to make your arch a truly unique and captivating centerpiece.
Flower arches are not just decorative elements; they are expressions of creativity and elegance that can transform any space into a picturesque setting. For more intricate designs or advice, consider consulting with a wedding florist.
Creating a free-standing flower wall is a popular DIY project for various occasions, offering a stunning and functional decorative element. Though it requires more detailed design and construction, the result is a magnificent backdrop perfect for photographs at events like weddings, anniversaries, baby showers, and parties.
Supplies You’ll Need:
- Plywood and several 2”x4” wood pieces
- Screws and a drill
- Paint and other decorative materials
- Floral cages or foam
- Adhesive materials (glue, wire, etc.)
- Fresh flowers or prepared flower sheets
Steps to Create a Free-Standing Flower Wall:
- Build the Wooden Frame:
- Construct a sturdy wooden frame using a large plywood board and 2”x4” pieces for leg supports. This will form a stable base for your flower wall.
- Decorate the Board:
- Paint and decorate any parts of the board that won’t be covered with flowers, ensuring it aligns with the theme of your event. A green background can make the flowers pop, while white can help mask any gaps.
- Attach the Flowers:
- Secure floral cages to the board and arrange your chosen flowers to suit the occasion. This is where you can get creative with your floral designs and colors.
- Consider Mobility:
- For added convenience, consider putting the flower wall on wheels for easy movement during the event.
While constructing a free-standing flower wall requires effort, it yields an authentic and visually impactful “wall” of flowers, making it a worthwhile project.